Showing posts with label nutritious delicious. Show all posts

Thursday, February 21, 2013

The famous Laura Thai Marinade

My thai marinade has become infamous with those who frequent our dinner table and also when we are invited to barbeques. I get asked for the recipe all the time, so finally folks, here is the secret to my Thai success!

This amount makes enough marinade to coat 6 chicken skewers, or 2 pieces of meat.

Combine the following in a bowl or measuring cup:

  • 1 stalk lemon grass, end roughly chopped
  • 2-3 Tbs olive or peanut oil (I use olive)
  • 1 fresh red chilli, de-seeded if desired
  • 1 clove garlic, chopped
  • 1/4 cup chopped coriander
  • 1 tablespoon grated ginger
  • 2 Tbs fish sauce
  • 2 tsp brown sugar
Mix well, so the sugar dissolves. Pour over your favourite meat - I have done this with chicken, turkey and fish and all have turned out superbly. I think it would taste good on pork, but unsure about red meats.

The marinading can be done an hour before cooking the meat. I usually give it 4 hours.

The meat can then be grilled, barbequed or baked.


Thai marinade in action!


On Tuesday night I had 3 of my gorgeous girlfriends over for dinner and we were having so much fun and laughing without the need for alcohol!

Our dinner was detox friendly, pregnancy friendly and dairy free. 


Not only did we have Thai marinade chicken, but we also had sweet potato slices shallow fried in coconut oil, garlicky goodness snowpeas and a simple & delicious salad provided by Kate & Erin - toasted almonds, broccolini, avocado, tomato and lettuce mix in a balsamic dressing.

Thursday, January 3, 2013

Summer meal favourites - exotic barbeque and salad

Summertime in Australia calls for the numero uno cooking device to come out and play - the barbeque. While charring meat is not good for you, the slow grilling of meat can be very healthy. And barbeques don't need to be all about sausages! You can make a barbeque an exotic affair with a bit of imagination and motivation, which hopefully this meal will inspire!

It was a gorgeous summer evening in Melbourne, so it calls for a meal to match it - barbequed turkey steaks marinaded in my own home made thai marinade, charred asparagus and zucchini spiced with cumin, mango, spinach & mint salad and a glass of Queensland mango wine. 


A healthy, whole food meal and would be great for a detox (minus the wine!)

Monday, November 19, 2012

Easy Entertaining - Easy as Dips


At high school I did this horrible subject called Easy Entertaining. The idea on this cooking class was to show  you how easy it is to cook for people you are entertaining for. A roast dinner, complete with bread & butter pudding for dessert plus the kitchen cleaned up all within an hour was not Easy Entertaining! Saucepans on fire, silicon paper causing toxic smoke after someone put it in the microwave, shaking with fear when showing your cooking efforts to the teacher for inspection.... ahh, the memories. Needless to say this subject left a permanent scar on me as far as what "easy" cooking entailed and scared me away from cooking for years.

If I was in charge of the subject, first lesson - making dips! Dips are so ridiculously easy, even my high school self could make them and would come away smiling.

For a Melbourne Cup barbecue this year, I decdied to make 3 very simple but tasty dips in a flash!

As I am unsure of the exact amount of dip made, I will use the size of the dip bowl in the pictures to  try and explain.


Tzatziki

I like to make this dip first, as I like to put it back in the fridge for a while before serving.
Grate up half a lebanese cucumber. I chopped mine with a knife when grated, but to break up the pieces a bit smaller.
Combine in a bowl: 2 crushed garlic cloves, the cucumber and 360g of Greek style yoghurt, pepper to taste. Mix until the cucumber is evenly distributed in the bowl, then put in the fridge until serving. This also allows time for the cucumber and garlic flavours to infuse in the dip for longer.

This dip is the perfect partner for some freshly baked pita bread chips - brush some oil lightly over pita bread, add some spice mix (I like cumin and pepper), then bake in a 180C oven for 10 minutes, or until crispy. YUM.

Makes 5 bowls worth.


Hommus

Hommus, hummus, houmus... you get the idea. Its one of these. This was my first attempt at hommus after half watching a chef make it on tv. Surely I won't need a recipe!

Blend together in a food processor or good blender: 1 can of drained & washed chickpeas, 2 tablespoons of tahini, 2 garlic cloves, the juice of 1 lemon, 1/4 cup of water, 1 tsp cumin, a good dash of olive oil and salt, chilli powder and pepper to taste. Blend until smooth.
Drizzle some olive oil on top with some paprika before serving

The mixture will be quite dry and may clog up. I spent a lot of time declogging my blender, but it worked out in the end!

Makes 4 bowls worth.


Guacamole


This tasty one I left until last, as avocado can change colour if left out too long and I wanted the dip to look its best! It also takes a total of 2 minutes to make.

Buy 1 avocado, which is pretty ripe (when squeezing it, it should be fairly soft, but the outside should not crack when squeezing). Spoon out all the flesh from one avocado into a bowl. combine with a dash of extra virgin olive oil, the juice of 1/2 a lime, 1 tsp of freshly chopped coriander, plus pepper & chilli flakes / powder to taste. Mash up the avocado using the back of a spoon (the softer the avocado, the easier to mash) and mix with all the ingredients until you get a consistency which you like - some like smooth, some like chunky!

Makes 2 bowls worth.


Once you start making your own dips, store bought ones just won't taste as good and you will be a hit at your friends parties for putting in the extra effort.

Good luck with your next entertaining project!

Tuesday, November 13, 2012

Spicy garlicky cripsy goodness snow peas & salmon

Ok, I think the title gives you the idea on what this is all about.

Recipe inspired from myrecipes.com, snow peas fresh from my in-laws garden :)


Tonights meal - hoisin glazed salmon, with steamed vegies and spicy garlic snow peas!

Hoisin salmon: 2 tablespoons of hoisin sauce, 2 teaspoons of tamari (or soy sauce) and 1/2 teaspoon of sesame oil. Marinading only needed to be done 10 minutes prior to cooking. I cooked mine in a fry pan with a bit of coconut oil, but it can also be baked.

The snow peas were the star of this dish and I had to share how to make AMAZING snow peas in 5 minutes!

Heat 1 tsp of coconut oil in a large nonstick skillet over medium-high heat. Add snow peas and 1/4 teaspoon salt; sauté for 2 minutes. Stir in 2 crushed garlic cloves and your choice of spices (I used Shichimi pepper mix); sauté for 1 minute. Stir in 1/4 teaspoon sugar; sauté 1 minute. Remove from heat; drizzle with 1/2 teaspoon dark sesame oil. Spicy, garlicky, sweet, crispy goodness.


And the steam vegies on the side, look to my steam vegies blog for more on those!

Tuesday, October 30, 2012

My favourite summer salad - mango mint nom nom

This combination of flavours has to be my all time favourite summer salad and is very popular amongst my family and friends. The best part? It's really super easy to make!

Toast some pine nuts in a fry pan with a little oil. Watch them carefully - they go from nicely toasted to burnt very quickly. When they start to smell fragrant, toss them around to brown both sides. Remove from heat when cooked and allow them to cool on a plate.

Slice a mango, wash spinach leaves, tear up mint leaves, chop up a capsicum and combine with the pine nuts. add some cracked pepper and a drizzle of olive oil and toss. The flavours of the fruit and vegies are so strong, a potent dressing isn't needed.


Don't feel obliged to stay with just these ingredients - depending on what is in the fridge, I may add extras - spring onions, avocado, cucumber and sundried tomatoes have all made guest appearances to the salad.

The mango and mint hit is so refreshing and summery, it is great with barbeques and grilled fish or meats.

Tuesday, October 23, 2012

The Glycemic Index & Load... Whats its all about?


For us in the southern hemisphere, Summer is approaching soon woop woop! This means lots of fun out in the sun and for some of us, shedding the winter kilos and getting our bodies back to looking toned and beach fab!

Without needing to result to fad diets or weight loss products, there are easy changes you can make to your every day life which will make you a healthier, happier person! 

One of these changes is choosing low glycemic index/load foods.

You may have heard ads on TV talk about their low GI range, but don't really understand what its all about. No dramas, Laura the Naturopath is here to answer those questions for you!

So tell me... What is the Glycemic Index (GI)?

The concept of the glycemic index (GI) is defined as the increase in blood glucose levels caused by foods during a 2 hour consumption after consumption. Each food is given a score where the higher the score, the higher the blood glucose levels have peaked.

Research suggests that elevated blood glucose levels can lead to the development of diseases, such as Diabetes Mellitus type 2, cardiovascular disease, high cholesterol levels and obesity. Imagine if all the people with these conditions changed their diet choices... the results would be amazing and leave some doctors out of a job!

What is high GI and low GI?

High GI foods cause a rapid rise in our blood glucose levels, giving you a big energy hit, however this is followed by a quick fall in blood glucose, leaving you even more tired than earlier.

Low GI foods cause a slower and more extended rise, and then decreases more gradually, giving you more energy for longer.


It is recommended to consume low GI foods, as you lower your consumption of unnecessary food and feel fuller for longer!

55 or less: Low GI food
56-69: Medium GI food
70 or greater: High GI food

So, wait... What is the Glycemic Load (GL)?

Many people discuss a low GI diet, but a low GL diet is only now becoming more known. To calculate its GI, each food was given a defined weight of 50g. In reality, we may consume more or less of this amount. The glycemic load equals the glycemic index times the grams of carbohydrates present in each serving of food.

10 or less: Low GL food
11-19: Medium GL food
20 or greater: High GL food

This means a food, such as watermelon has a GI rating of 103, but each serve has a GL of 4.

Watermelon shark: high GI, low GL, 100% awesome looking.

Why do some of the same foods peak at different values?

Some foods are processed differently than others and contain varied amounts of carbohydrates from those made by other companies. It has been found that even the temperature of foods can alter its glycemic index/load.

Tasty low GI / GL meal ideas!

Why not try...
Breakfast:
o    Porridge with crushed nuts and apple or berries
o    Hommus (chickpea paste) on wholegrain toast

Lunch:
o    Rye sandwich with roast turkey breast and salads
o    Fresh lentil soup

Dinner:
o    Grilled salmon with stir-fried vegetables (carrot, capsicum, onion, broccoli) and rice noodles
o    Wholegrain pasta with homemade Bolognese (beef and vegetables)

Snacks:
o   Trail mix of raw almonds, raw cashews, sultanas, dried apples,  dried apricots and goji berries
o   Popcorn cooked in the saucepan – tastes better than microwave popcorn and is a LOT healthier - stay tuned for a blog on this!
o   Hommus dip with carrot and celery sticks, or wholegrain crackers
o   Fresh pieces of fruit

A Word of Warning...

The GI scale does not take into account preservatives, refined products, pesticides or any other nasty stuff that has been added to foods in processing. So if you see a packet of biscuits which claim they are low GI, use your common sense still - check the ingredients. If the majority are numbers or words you have never heard of, put the packet back on the shelf and move on! They may be low GI, but the other ingrredients could make it detrimental to your health!

This all makes sense... so how do I know what are the GI / GL levels of foods?

I've done all the hard work for you already! The link below is a handout which lists many common foods and both their GI and GL rating, plus some simple ways to swap from high GI/GL products to low ones.


You are most welcome! :)


Monday, July 9, 2012

Superfood Soup - aka Naturopath Bingo Soup!


*vegan friendly *gluten free *dairy free *contains sesame seeds – avoid if allergic!

Why Naturopath Bingo?

Us naturopaths give great advice to patients on superfoods which are fantastic for health. And we all know the best foods so give prescriptions for the same foods. Thats why you could play naturopathic bingo with this soup. Its full of the amazing superfoods that naturopaths rave about which are full of nutrients and are so good for your health!
Superfood stars of this soup...
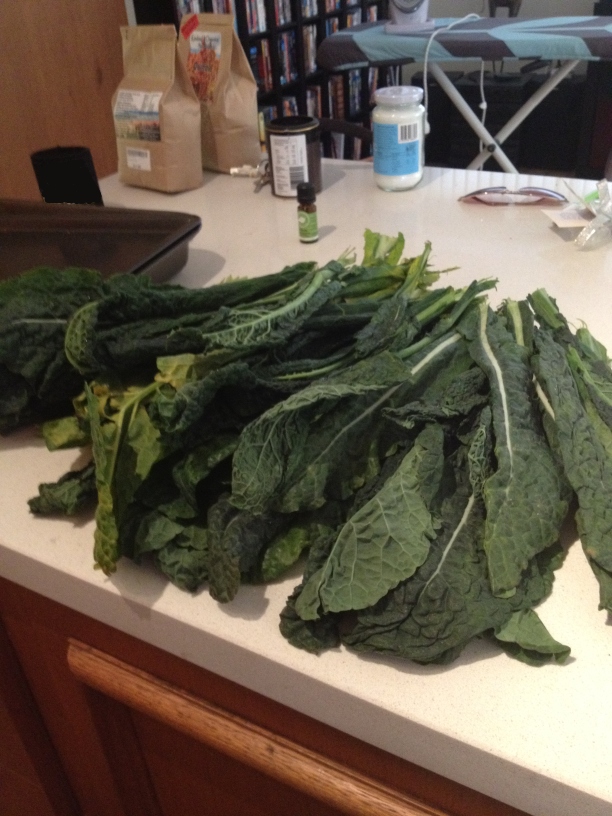
  •   Kale – Kale is the number one choice for naturopaths when eating dark leafy greens. Dark leafys are one of the most concentrated sources of nutrients in foods, with them being rich in minerals (including calcium, iron, magnesium and potassium) and vitamins (C, E, K and Bs). They also contain phytonutrients which provide antioxidant properties and are excellent for protecting cells against eye damage and age-related problems. The darker the green, the more nutrients and kale is the darkest green of them all! I had a huge amount of kale delivered to me this week and so I found this soup online so I could utilise it before it went off.

Kale explosion!!
  • Quinoa – Known as the mothergrain, quinoa is a complete protein, contains many nutrients and is also high in fibre. I’ve talked about why you should jump on the quinoa bandwagon in another blog, which you can find by clicking here!
  • Tahini – Tahini is sesame seed paste and is a fantastic vegan alternative to butter. It is also a great source of protein, as well as omega-3 and 6 fats, calcium, fibre, iron, magnesium, B vitamins and vitamin A. Tahini tastes similar to peanut butter, but is less likely to be oxidised – sesame seed oil is very stable in room temperature.
  • Garlic – Garlic is an pungent food which contains many medicinal properties. Raw garlic contains a constituent known as allicin, which is antimicrobial and fantastic to eat when you have a cold. This constituent is not heat stable and will lose its antimicrobial properties when cooked. Add it to the end of your cooking process to receive its full antimicrobial benefits. Garlic is also fantastic for cardiovascular health, lowers cholesterol and blood pressure, helps with liver detoxification and is anti-inflammatory.
I improvised a little as I had a bit more kale and wanted to add a bit more superfood love. Below is the original recipe and the parts in red are the parts I added.
Ingredients:
  • 1 small bunch kale *I used a BIG bunch of kale!
  • 4 tablespoons olive oil * I used coconut oil instead, as it was for heating.
  • 1/2 medium onion, finely chopped *2 brown onions
  • 1/2 cup quinoa *1 cup of quinoa, washed thoroughly first
  • 1/2 cup green lentils * 400g lentils, washed
  • 1 heaping teaspoon cumin 
  • 1/2 teaspoon curry powder
  • 5 cups water *2 litres of vegetable stock
  • 1 vegetable bouillon cube * didn’t use this, as I used liquid stock
  • 3 tablespoons tahini, plus more for garnish *4 tablespoons tahini
  • 2-3 tablespoons tamari (or soy sauce) *4 tablespoons tamari (wheat-free soy sauce)
  • * 4 cloves of smashed garlic

 Method:
  1. Wash and de-stem kale (use kitchen shears to cut along the sides of the stems.) Tear the leaves into smallish pieces.
  2. Heat oil in a large pot over medium heat, add onion and sauté for 3-4 minutes. 
  3. Add quinoa and lentils with 2 cups of stock and cook for 2-3 minutes; add cumin, curry powder, tahini, garlic, tamari and kale. Mix well. Add rest of the stock and bring to a boil. Cover and turn down heat to low. Simmer for 35-40 minutes.
  4. Simmer simmer!
  5. Carefully blend the hot soup in a food processor or blender and return to pot. You can skip this step or blend only half of the soup if you want some texture, but I think it’s nicest smooth. Add more tahini and tamari to taste.
  6. To garnish, mix 1-2 tablespoons of tahini with a small amount of water until it becomes smooth and bright. Drizzle on top of the soup and serve.

Soup is served!
The verdict...
This soup is delicious and gets better when left for a while. It tastes a little bit salty and I didn’t add any extra tamari at the end, but the aftertaste is amazing and it leaves you feeling satisfied, not full and very healthy!

Original recipe from: http://www.cookthink.com/recipe/11548/Kale_Soup

Wednesday, July 4, 2012

Apple Sauce

Happy apples... aka happles!

Apple sauce from a jar? Tastes boring! 

Also, do you know whats in jar apple sauce? I went onto the Coles online website to check out the ingredients of a couple...
  • Apples: Makes sense. I mean, it IS apple sauce! But what do we know about the apples? Are they fresh? Are they rotten? Are they covered in pesticide sprays? Isn't it better to make it yourself and choose the apples?
  • Sugar: The amount of sugar added is not mentioned, nor is the form of sugar.
  • Food acid 330: Added as an acidity regulator and antioxidant. This is a citric acid, in which there is not problem in its naturally occurring form. However, with artificially produced 330 (depending where or how it is produced with using sulfuric acid), many believe the product may contain mould, and/or sulphites which were not filtered out of production. For most people, sulphites are safe, however some people are allergic and ingestion can cause asthma and allergic reactions. Most citric acid is produced from corn and manufacturers do not always take out the protein which can be hydrolysed and creates MSG (621) - which is known to cause allergic reactions in many people, so avoid if you are sensitive to MSG. 330 has also been known to damage tooth enamel
  • Food acid / Antioxidant 331: Sodium citrates - used to regular acidity and as an antioxidant. It has not caused any known reactions.
  • Antioxidant 300: Ascorbic acid - an antioxidant, colour and preservative. Essentially this is a form of Vitamin C.

Why not spend 5 minutes prep time (+ 10 minutes cooking) and make your own? 


Thats some mighty fresh ingredients in this saucepan...
Melt a tiny amount of butter in a saucepan, then add 2 diced apples, ½ chopped red onion, 2 smashed cloves of garlic, a sprig of rosemary, salt, pepper and a small amount of filtered water to make a really tasty savoury apple sauce! Once all our cooked, use a handblender or masher to combine and serve.  

There you have a fresh apple sauce with REAL antioxidants added and tastes amazing.  It really adds a wow to your meals with very little effort!
Blended up and ready to eat!


Thursday, June 21, 2012

10 Reasons why you should jump on the quinoa bandwagon!

Quinoa (pronounced keen-wah) has recently become popular in the Western world and has even made it onto the media circuit, it being used in meals on The Biggest Loser, My Kitchen Rules and Masterchef, just to name a few. So is this just a fad new food, or is it something to be taken seriously? If you haven’t tried it, its definitely time to jump on the quinoa bandwagon and I’ll give you 10 reasons why!
  1.  Quinoa is an ancient grain native to South America and mainly found in Bolivia, Peru, Columbia and Ecuador. For these cultures, this is a staple grain. The ancient Incans called it ‘the mother of all grains’ , valued it the same as gold and held it to be sacred.
  2. Quinoa is a gluten free grain, so is a coeliac-friendly alternative!
  3. Quinoa is one of the few plant-based complete proteins. This means that it contains all of the essential amino acids necessary for the dietary needs of humans. If you are vegetarian, you may be at risk of not eating enough of all these amino acids each day, so quinoa is a great option! Not only is quinoa a complete protein, its also a good source of protein, with roughly 14g of protein per 100g of uncooked quinoa!
  4. Quinoa is a good source of both soluble and insoluble fibre – Eating soluble fibre has been shown to reduce the risk of developing heart disease by reducing cholesterol levels.  Eating insoluble fibre has been shown to reduce the risk of developing constipation, colitis, colon cancer and haemorrhoids.  Diabetics on high-fibre diets need much less insulin.
  5. Quinoa is high in magnesium, phosphorus and potassium. Those on potassium-sparing diuretic medications should note that 1 cup of cooked quinoa is equivalent amounts of potassium to 1 banana. Quinoa also contains smaller levels of iron, zinc and calcium.
  6. Quinoa is easy to digest, which means those who have trouble absorbing nutrients from foods (such as the elderly, people on some medications, or with gut issues) will find this a nourishing and easy way to get your nutrients.
  7. Quinoa is very easy and quick to cook! Before cooking, wash your quinoa under water thoroughly to remove the outer coat of saponins which make it more difficult to digest. Some people like to soak their quinoa for 5 minutes before use to be sure all saponins are gone. The cooking method is similar to rice, bringing 2 cups of water to 1 cup of grain and cover on a low simmer for 10-15 minutes, or until the germ seperates from the seed. The cooked germ looks like a tiny curl and should have a slight bite to it. You can also cook it in a rice cooker on the same water : quinoa ratio.
  8. Uncooked vs. Cooked Quinoa: 1/3 cup makes this much cooked (this is an average dinner plate)
  9. 2013 has been declared the UN International Year of Quinoa. A grain that has had a year declared for it can’t be all that bad!
  10. It tastes yummy! The taste and texture of quinoa is a bit like brown rice crossed with oats. It’s fluffy, creamy, crunchy and somewhat nutty, all rolled into one.
  11. Quinoa is a very versatile grain, with it being used in both sweet and savoury dishes. A few ideas on how to have it...
·         Make a quinoa salad - you could try my quinoa tabouli, or simply grate up some vegies and toss your quinoa in with it. Very easy.
·         An alternative to using wheat pasta – very tasty with a pasta sauce (like my ridiculously easy sauce!)
·         Add to soups to add texture and make a hearty meal
·         Instead of fried rice, make fried quinoa!
·         Quinoa patties
·         Quinoa porridge
·         Add quinoa flakes to smoothes
·         Puffed quinoa with muesli and yoghurt (similar taste to rice bubbles!)
·         Just by itself!

So there you have it, ready to jump on the bandwagon now?  You can buy quinoa from some supermarkets (its usually in the health food aisle), at markets and health food stores.

Think before you buy...

Something which has recently come to light about quinoa is unfortunately as the demand of it increases in the Western world, the price has also increased for the native people in Bolivia. This means what was once a staple keeping people healthy is now unavailable and they are forced to eat more nutritionally-devoid foods, like white rice and noodles.
Check the back of the pack of your quinoa to see where it comes from.  If you are in Australia, Kindred Organics from Tasmania is available in many stores so purchase local products to help local farmers and reduce the requirements from Bolivia.

Quinoa comes in white, red and black grain. There is no large difference between them all nutritionally, some people say that the red grain is slightly harder to break down that the white. Some places make a mix of the 3 to make a multicoloured dish.

So now you know about this amazing food! Be inspired to add it to your breakfasts, lunches and dinners!

Uncooked vs. Cooked Quinoa - know the difference!


Tuesday, June 12, 2012

Coconut & Nut-crusted Barramundi with lime & chilli oil, served with Roast Vegetables


Whats on tonights menu?

I make sure I have fresh fish at least once to twice a week, so to help inspire everyone, I will be blogging different fish recipes for you all to learn to cook! This recipe is originally from my other blog - detoxober, a detox survival story. Although I'm not detoxing at the moment, this meal is still delish and fantastic for Winter!


The vegies.
I’ve roasted some sweet potato, beetroot, zucchini, garlic and onion.
How to roast: toss the sliced raw vegies in some olive oil, salt and pepper. Cook for a total of 45 minutes in an oven at 180C, with a 2nd seasoning and added fresh rosemary after 25 minutes. Drizzle extra virgin olive oil on top before serving.

The barramundi.
The crust: Sounds more fancy than it actually is. We have a jar full of mixed raw nuts (almonds, cashews, brazil nuts, hazelnuts, pecans and walnuts). I grabbed 3 handfuls of nuts, with 2 handfuls of dessicated coconut, then whizzed up in a coffee grinder until fine.
The cooking: Rub some olive oil into the slices of barramundi, then coat in the nut mix.  Bake in the oven for 20 minutes, or until fish is cooked.
(I put the fish in the oven after 25 minutes of vegie cooking, so its done at the same time)

The dressing.
Olive oil... lime juice... chilli powder... pepper. Too easy. Very tasty.  These flavours are very much to taste and should be experimented in your own kitchen rather than following a recipe. You only need enough to drizzle on the fish, so don't overdo it. 

The result.
Ta da! a chef is born!


The verdict.
The fish was to die for. The use of the coconut in the crust added a greater dimension to the flavours. Normally I have a blob of butter with my roast vegies, so using the olive oil was a bit different, but gave the same enjoyment. I think this will be a regular new favourite.

Want another fish recipe? heres a link to my blog for pesto-crumbed salmon!

Wednesday, June 6, 2012

Steamed Vegetables


Whats on tonights menu? Steamed Vegetables!

I’m sure I just heard a resounding  sigh and “errr, I don’t think so” from my readers.  Yes, steamed vegies! They don’t need to be as bland as the reputation they have!

Whats so good about steamed vegies?
  • Avoids heating oil increasing oxidation, toxicity and DNA damage.
  • Steaming avoids fat and cholesterol intake
  • Increased digestion and absorption of protein in steamed fish vs. fried 
  • Steaming more alkaline less acidic
  • Overcooking or burning food is easily avoided when steaming it.
  • Steaming also results in a more nutritious food than boiling because fewer nutrients are leeched away into the water, which is usually discarded.
  • When comparing steamed vegies to boiled ones, steamed vegetables retain more vitamin C and folate, so making them more nutritious!
  • Versus microwaved vegies, steamed vegetables retained their antioxidant properties better.
How to steam vegies:
Never steamed vegies before? Heres how to do it.
  • Use a bamboo steamer – fill a saucepan with water and put a bamboo steamer on top (these are fairly cheap and can be bought at the supermarket and reused)
  • Some woks come with a steamer plate (like I have!) – fill the bottom of the wok with water, then put the steamer plate on top.
  • Some rice cookers have a steamer accessory – your steamer manual will have instructions on how much water to use.
  • The pan method: put about 1cm of water into a pan. Once the water is boiling, add the vegies to the pan. Because there is only a small amount of water, the steam will do the cooking.
  
      You can also steam in the microwave, however this is how to traditionally steam.

Carrot, capsicum, kale, zucchini and onion ready to be steamed!
  1. Wash your vegetables and chop them up. The thicker the vegies, the longer it takes to cook.
  2. Allow the water to boil, then put the vegies on top on the steamer, which allows the steam to cook the vegies without getting wet.
  3. The cooking time changes depending on how thick the vegies are cut. I have found that once the colours start to look more vibrant, it means they are ready. You still want some crunch in them.
  4. Some people like to rinse their cooked vegies under cold water to stop the cooking process. I haven't tried this yet, so am not sure how much of a difference this makes.

What can you steam?
Heaps of vegies are steamable! Carrots, capsicum, broccoli, spinach, kale, onions, corn, zucchini, bok choy, asparagus, cauliflower, peas, snowpeas, green beans, artichokes, brussel sprouts...

Take note! Different vegetables will take different amounts of time to be ready. A thinner leafy vegetale, such as spinach, will only need a small amount of time, wehere as a more hardy food like a carrot would take longer.

How to add some extra taste to your steam veg..
To keep the nutrition of these foods, avoid putting a heavy sauce on them, like butter, white sauces or cheese sauces.

Some ideas for you...
  • Olive oil
  • Tamari (wheat free soy sauce)
  • Sesame Oil
  • Salt & Pepper
  • Cumin
  • Fresh ginger grated – put your vegetables on top of grated ginger to allow the flavour to seep through!
  • Fresh herbs (parsley, dill, thyme)
  • Crushed garlic
  • Lemon juice
  • Chilli
  • Balsamic vinegar
  • Coconut oil

I love to make a mix of tamari, sesame oil, olive oil, salt and pepper. I then toss the vegies in this mix and serve. Yum!


Wednesday, May 30, 2012

Whats on Tonights Menu? Tomato and Lentil Soup!

Its almost winter, which is officially soup season! Making soups are a great way to get nutrients in a delicious form and are so easy to make. Tonight I experimented to make a tomato and lentil soup, based on a recipe I found online and then I changed it to spice it up a little.

Message me if you want the original recipe, but heres what I made...

Serves: 6 large serves, 8 normal serves

Ingredients
  • 2 brown onions, chopped roughly
  • 1 tablespoon butter
  • 10 roma tomatoes, chopped roughly
  • 2 cans of lentils (800g), drained and washed thoroughly (you could also use non-canned as well!)
  • 1 teaspoon dried hot chilli powder
  • 1/3 bunch of fresh basil
  • 1 ½ teaspoons ground cumin
  • 500ml (2 cups) vegetable stock
  • Salt and freshly ground black pepper to taste
  • 2 stalks of celery 
  • 5 cloves of garlic, smashed but not chopped
Preparation method
  1. Heat the butter in a large heavy based saucepan. Cook the onion and celery until onion starts to go translucent and celery is slightly aromatic.
  2. Add the tomatoes, lentils, garlic, chilli, basil and cumin, stock and a few grinds of salt and pepper. Stir, then bring to the boil, then reduce heat to medium low and simmer for 20-25 minutes, or until the lentils are tender. Stir occasionally and get a whiff of the awesome concoction you are making. Enjoying food can start with the aroma!
  3. Simmer, simmer... sniff! sniff!
  4. Remove from the heat, allow to cool slightly, then purée the soup with a hand-held blender. Season to taste with salt and pepper.
  5. For a special touch, garnish each bowl with a dollop of natural yoghurt or cream, plus some finely chopped spring onions. Serve with a crusty seeded wholegrain roll if you want some bread with it as well, as pictured.

This has been quoted by my husband to be “Best. tomato. Soup. Ever.” My brother who rates his palate for good food on par with Matt Preston said that the soup was "well balanced, a good flavour hit without being overpowering and leaves you feeling full but not bloated". Not bad for very little effort! I often make a large batch when making soups, then keep it for lunches during the week, or freeze it to use later. Bulk cooking saves time and money, so is a great option for those who are busy!

The real hero of this soup is the cumin, a spice native to India and the Eastern Mediterranean.  It is an aromatic warming spice commonly added to curries, stews and soups.

Medicinally speaking, cumin is used and highly valued is Ayurvedic (Traditional Indian) medicine. It is a known carminative, which means it helps soothe intestinal spasm, relieve bloating & flatulence and improve peristalsis (your intestinal digestion movement). It has also been shown to improve liver detoxification, help pancreatic enzyme stimulation, be a potent antioxidant and help fight colds. Keep in mind, this would be at a much higher dose than a couple of teaspoons in soup, but with regular eating, may help digestion long term.

Another kitchen experiment success! 

Wednesday, May 23, 2012

Whats on tonights menu? Quinoa Tabouli!


Ok, so its not really tabouli. Tabouli is traditionally made with bulgur, parsley and tomatoes chopped up. This is a bunch of other things chopped up, but its pretty and green and still just as nice to have as a side.

With winter approaching, its important to keep up our leafy greens. They are still out there growing, but because we associate making salads as a summer affair, we tend to skip our raw crunchy fresh veg and replace it with roasted goodies. Don’t get me wrong, roasted vegetables still are a fantastic source of nutrients, however some nutrients can be lost in cooking, so its important to keep up the raw stuff as well!

This salad is chock full of leafy greens, which are a powerhouse of nutritional goodness and are one of the most concentrated sources of nutrients in foods. They are a rich source of minerals (including iron, calcium, potassium and magnesium) and vitamins (including vitamin C, E, K and many of the B vitamins). They also contain a variety of phytonutrients including beta-carotene, lutein and zeaxanthin which are important for protecting cells from eye damage and age-related problems.  The darker the green, the richer the nutrients. Kale (also known as Tuscan cabbage) is a favourite among naturopaths and healthy food followers as it very dark green and therefore very nutritious (and delicious!).  To learn more about kale, goto my friend Natalies brilliant blog, where she shows you how to cook kale in 5 ways... http://nataliethenaturopath.tumblr.com/post/21426066710/kale-five-ways-part-i-kale-smoothie


Now its salad making time!
How to make...
  1. Cook up ¾ cup of raw quinoa (pronounced keen-WAH) in a rice cooker (the ratio of water to quinoa is 2:1) or saucepan. It should take about 20 minutes to cook. Drain (if cooked in a saucepan) and allow it to cool.
  2. Toast a handful of pine nuts in a frypan on a low heat. Once they start to be aromatic and turn golden, take off the heat, they can burn quite quickly. Set aside to cool. *This is an optional extra, but adds new dimensions when added to foods!
  3. Using a knife or food chopper (not sure if thats the official name of it, but it chops food, so therefore I name it this!), chop up finely your greens. This can be whatever greens you want. Tonight I used a mix of spinach, rocket, kale and basil. I used a few handfuls of spinach, 1 handful of rocket, a handful of basil and 10ish kale leaves (stalks removed).You could also add parsley, mint (if you’re after a freshness, but I wouldn’t add much), beetroot greens, coriander, mustard greens, carrot tops, celery leaves, bok choy...  Once finely chopped, put into your salad bowl.
  4. Chop up any extra ingredients you want. This not only gives you colour, but provides the extra flavours which will complement your greens. Tonight I added pine nuts (see above), sundried tomatoes, red onion and capsicum. Stuck for other vegies to add? I’ve also used tomatoes, carrot and celery. Use your palate to decide what you want. Add the chopped extras to the bowl with the greens.
  5. Just before serving, combine all ingredients, add cracked pepper, olive oil and a dash of sesame oil (if you have it), then toss.

Serves 4.


This can served as a side (as pictured above), or by itself. Tonight I served it will salmon cooked in coconut oil and topped with salt, pepper and shichimi (Japanese pepper mix).

Don’t be afraid of your kitchen, it can smell your fear. Instead, face it head on armed with a bunch of ingredients and show it what you can do!

 –Laura x

Wednesday, May 16, 2012

Whats on tonight's menu? Ridiculously Easy Pasta!


I grew up on supermarket pasta sauces. Ads make them look delish, showing a saucepan filled with tomato, garlic, onion and other herbs which have been gently simmering together.  Apparently this saucepan of goodness is the sauce you buy in the jar.  I don’t know what half of the ingredients are on the back of those sauce jars, but I know its not like an Italian mamma used to make!
People buy stuff in a jar because its convenient and easy. I offer you a pasta sauce which is ridiculously easy, 100% real food ingredients and healthy for you too!

All you need...
  • Roma tomatoes (2-3 big ones, or 5-6 small ones)
  • 1 Red onion
  • Fresh basil leaves,torn up (a small handful should do)
  • Extra virgin olive oil
  • Salt & Pepper
*****
  1. Chop up your onion and gently fry.
  2. When onions are translucent, add the tomatoes (which are diced up to your desired level of chunkiness), plus some salt & pepper to taste. Allow it to simmer gently (just like the ads!)
  3.  Add the basil a few minutes before the pasta is cooked.
  4. Once the pasta is drained, put the pasta back in the saucepan, add the sauce plus a few drizzles of olive oil. Toss, then serve with freshly shaved parmesan cheese.

Yep, thats it.  And you can improvise with this too – pine nuts, garlic, carrot, fresh mince, zucchini, eggplant, mushrooms, chilli, beans, rosemary, oregano, parsley – all these can be added to the sauce.  My sauce tonight has added sundried tomatoes, pine nuts and garlic.

Simmering up a storm!

 To keep the healthiness going in this dish, avoid using white pasta. There is little nutritional value in white pasta and it has a high glycemic index (which means it will give you a high energy boost quickly, followed by a quick energy drop). Wholemeal pasta, buckwheat pasta or spelt pasta has a lower glycemic index (lower energy release) and contains fibre. Did I mention that they taste good as well?

Bon appétit!  

-Laura x


Creamy sauces on a non-refrigerated shelf... anyone else think this is just plain wrong??

Wednesday, May 2, 2012

Whats on tonights menu? Rainbow Salad!


Whats on tonights menu?
It’s getting colder outside, so its good to have a nice hearty meal! Winter doesn’t mean you should give salads a rest either! You can make lighter salads for summer and use more root vegetables (carrots, pumpkin, potatoes, beetroot) in winter. This is one of my favourite winter salads, which I named rainbow salad because its o so pretty to look at! It is a tasty side dish for most meats. I usually have it with fish or chicken.

How to make...
  1. Lightly fry up 1 sweet potato, which has been chopped into 1cm cubes. Add salt and pepper to taste.When the colour starts to change (it will go a deeper orange when cooked) and it starts to go a bit brown, add in 1 chopped red onion and 4 chopped broccolini stalks (broccoli also works well). Cook until onion is transluscent and broccolini is a brighter green. Take off the heat and allow it to cool.
  2. Grate up 1 medium sized raw beetroot. Add to the bowl.
  3. Chop up 4 cups of leafy greens. I use 2 cups of baby spinach, 1 cup of kale and 1 cup of rocket. Use whatever combination you want, but avoid iceberg lettuce! Add to the bowl.
  4. Finely chop up 100-150g of sundried tomatoes. These add a fantastic flavour to the mix.  Add to the bowl.
  5. Once cooled, add your sweet potato mix to the bowl, then add some cracked pepper and drizzle extra virgin olive oil. Toss just prior to serving (otherwise the beetroot tends to overtake the colour!)

Serves 4.
Another success which shows that experimentation in the kitchen can take your taste buds on an amazing journey. –Laura x

Monday, April 2, 2012

Whats on tonights menu? Pesto crumbed salmon!


Whats on tonights menu?
Tonight its roast vegies (beetroot, zucchini, capsicum and onion) with pesto-crusted salmon. I make my own pesto and breadcrumbs, so heres the recipe for one of my favourite dinners:

Pesto:
In a food processor, blend up:
2 cups washed, fresh baby spinach leaves and rocket mix
2 garlic cloves
¼ cup pine nuts
2 tbs olive oil
2 tbsp parmesan cheese (use fresh stuff, not powdered!)
Small handful of fresh basil leaves
Pepper to taste

I make my own breadcrumbs in a coffee grinder. After looking up the ingredients on the back of pre-made crumb mixes,  you will be motivated to make your own crumbs too!

Smear the pesto on your salmon, then sprinkle with crumbs. Cook for 25 minutes in a 180 degree oven.

Too easy and tastes great!